• Facebook
  • Pinterest
  • Youtube
Crystals & Crochet
  • Home
  • Profile
  • Crystals
    • Amazing Adventures
    • Domestic Goddess
    • Words Of Wisdom
  • Crochet
    • Crochet Blog
    • My Designs & Patterns
      • Afghan Squares
      • Blankets / Afgan
      • Crochet-A-Long
        • Cosmic Cal
        • Mandala Madness
        • Whispers from the Past
        • Heart of Friendship
        • Sweet Caroline
      • Cushions
      • Ponchos / Wraps / Shawls
    • My Tutorials
      • Basics
      • Color
      • Joining Squares
      • Special Stitches
  • Blog
  • Contacts
    • Terms of Use
    • Disclosure and Privacy Policy
Select Page

Whispers from the Past Part 5

Welcome to part 5 of Whispers from the Past.

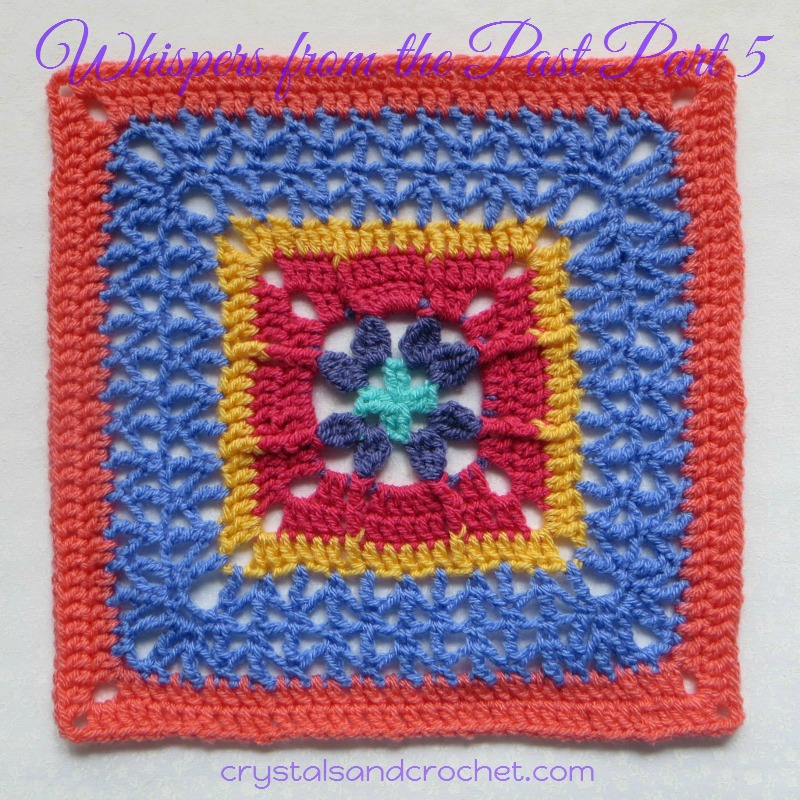
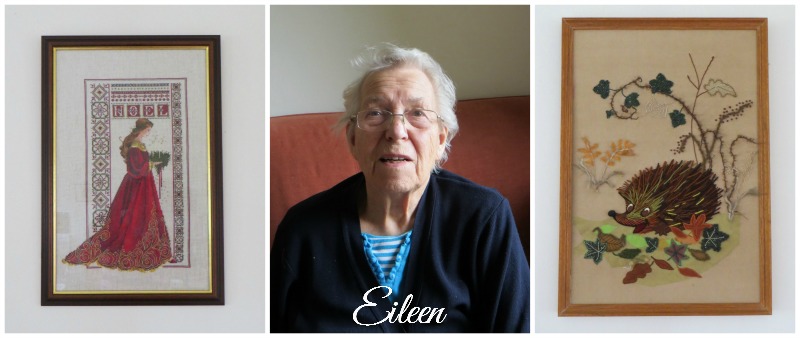
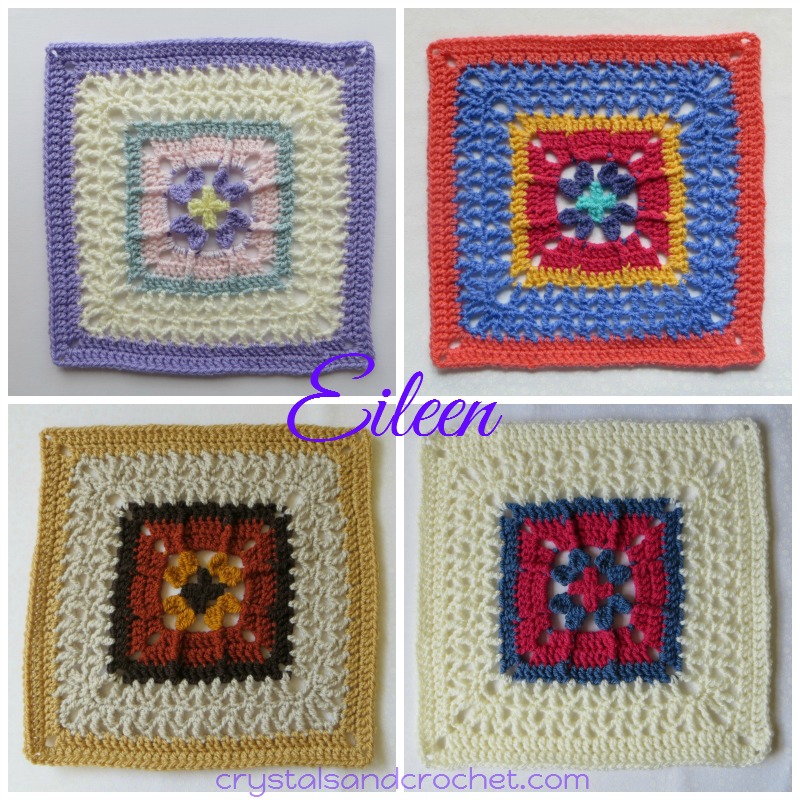
This week’s square is named for my Mother, Eileen.

Mum is the most amazingly creative lady, she used to be the County Arts Adviser for the Girl Guides, and has taught thousands of young people how to enjoy many different crafts, from Quilling, Pyrography, Tile Painting, Sewing, Knitting, the list goes on and on. She has some amazing pieces of work in her home, both Cross Stitch and Modern Applique.

Here are two of my favourites, the beautiful cross stitch and the lovely, fun Hedgehog, I actually claimed him as mine many years ago, but as I now live with Mum again, he is back in her house, he just makes me smile every time I look at him.

And here is Mum.

eileen-pic

Mum has always loved to work in groups, and bring people together. So this square HAD to include some clusters, where we bring stitches together, and the front post stitches, made around the clusters, to me symbolise keeping groups together in a soft hug. ♥

We will also be using another mesh design, based on the traditional Triangle Mesh stitch pattern. This is a stitch I have used in the past for simple lacey scarves.


♥ Useful Stuff

♥  Eileen Square Video Tutorial.

♥ There is lots of help available, on the CAL Crochet A-Long group on Facebook, in my Ravelry Group, or on the Crystals and Crochet Facebook page.

♥ Please remember this is my design and is covered by copyright law. You may share a link to this page with anyone, you may print off the photo or written tutorials for your own use, but please do not alter or change in any way.
Please love and respect me, as I love and respect you. ♥

♥ If you haven’t read the introduction post, then please find it here. You will find all the information on Yarn Packs, how much yarn you will need, hook sizes, the finished size of your blanket and all the resources available.

♥ It is worth book marking the main Whispers from the Past page as it will contain all the posts about the project and each weekly part.


♥ PDF downloads

♥ US terms

♥ Written Pattern with small picture
♥ Photo Tutorial

♥ UK terms

♥ UK terms photo tutorial  round 5 now corrected

♥ Chart

♥ Part-5-chart


♥ Translations

For the translated versions of the CAL, please click on the links here and it will take you straight to your preferred language. With no need to scroll down further on this page.
And another HUGE thank you to the awesome team of translators, from the CAL – Crochet A Long Facebook group, for the fantastic job they have done with all the translations. ♥

♥ Afrikaans
♥ Danish – Dansk
♥ Dutch – Nederlands
♥ Finnish – Suomi
♥ French – Français
♥ German – Deutsche
♥ Greek – Ελληνικα
♥ Hebrew – עברית
♥ Korean – 한국어.
♥ Norwegian-Norsk
♥ Persian – فارسی
♥ Spanish – Español
♥ Swedish -Svenska

You will need to make 4

Part 5.

eileen-4b

Colours per round for yarn packs

wftp-part-5-colours

US terms used throughout

 Abbreviations

Whispers abreviations[] Hints: Are typed in italics and coloured purple, they are to help and guide you and hopefully make life a little easier, especially for beginners.

Reference to photos is [P] with the relevant photo number

* * Repeat instructions between asterisks the amount of times specified.
This is normally a repeat for a complete side and will consist of multiple instructions.

() Repeat instructions between parentheses the amount of times specified.
This is a lower level repeat.

Special Stitches

Beginning Tr Cluster: Chain 3, yarn over twice, insert hook into same st/sp, yarn over and pull through 2 loops twice (2 loops on hook), yarn over twice, insert hook into same st/sp, yarn over and pull through 2 loops twice (3 loops on hook), yarn over and pull through all 3 loops.

Tr Cluster: Yarn over twice, insert hook into indicated st/sp, yarn over and pull through 2 loops twice (2 loops on hook), yarn over twice, insert hook into same st/sp, yarn over and pull through 2 loops twice (3 loops on hook), yarn over twice, insert hook into same st/sp, yarn over and pull through 2 loops twice (4 loops on hook), yarn over and pull through all 4 loops.


Hint: corner chain spaces are not included in any stitch count.

1. Starting with a magic ring, ch 3 [counts as dc], dc, (ch 3, 2 dc) 3 times, ch 3.

Join to top of ch-3, fasten off, and secure ends.
Stitch count: 8 dc, 4 ch-3 spaces.

r1

2. Make a beginning tr cluster in any ch-3 space [P1,2], (ch 4, tr cluster) in same space,

*ch 4, skip next 2 sts, in next ch-3 space (tr cluster, ch 4, tr cluster). *

Repeat from *to * 3 times, ch 4.
Join to starting tr cluster, fasten off, and secure ends.
Stitch count: 8 tr clusters, 8 ch-4 spaces.

r2

3. Join with a standing dc in ch-4 space before any tr cluster pair [P1], fptr around next cluster, [P2]

*in next ch-4 space (2 dc, ch 3, 2 dc) [corner formed], fptr around next cluster,
5 dc in next ch-4 space, fptr around next cluster. *

Repeat from * to * 4 times, omit last dc and fptr.
Join to standing dc with a sl-st.
Stitch count: per side: 9 dc, 2 fptr.

r3

4. Ch 3 [counts as dc] [P1], fptr around next st [fptr], dc in next 2 sts,[P2]

*in ch-3 corner space (2 dc, ch 3, 2 dc) [P3], dc in next 2 sts, fptr around next st [fptr], dc in next 5 sts, fptr around next st [fptr], dc in next 2 sts. *

Repeat from * to * 4 times, omit last 4 sts [dc, fptr, 2 dc].
Join to top of ch-3, fasten off, and secure ends.
Stitch count: per side: 13 dc, 2 fptr.

r4

5. Join with a standing dc in last dc of any side, [P1]

*in ch-3 corner space (2 dc, ch 3, 2 dc) [P2], dc in next 4 sts, fptr around next st, dc in next 5 sts, fptr around next st, dc in next 4 sts. *

Repeat from * to * 4 times, omit last dc.
Join to standing dc, fasten off, and secure ends.
Stitch count: per side: 17 dc, 2 fptr.

r5

6. Join with a standing tr in any ch-3 corner space [P1], (ch 3, tr) in same space, [P2]

*(ch 2, skip next st, sc in next st, ch 2, skip next st, tr in next st) 4 times [P3], ch 2, skip next st, sc in next st, ch 2, skip next st, in ch-3 corner space (tr, ch 3, tr). *

Repeat from * to * 4 times, omit last corner group.
Join to standing tr with a sl-st.
Stitch count: per side: 5 sc, 6 tr, 10 ch-2 spaces.

r6

7. Ch 1, and sc in same st, [P1]

*in ch-3 corner space (sc, ch 2, sc), (sc in next tr, ch 1, tr in next sc, ch 1) 5 times, sc in next tr. * [P4]

Repeat from * to * 4 times, omit last sc.
Join to 1st sc with a sl-st.
Stitch count: per side: 8 sc, 5 tr, 10 ch-1 spaces.
Hint: your work will curl up at this point.

r7

8. Ch 6 [counts as tr plus ch-2] [P1], sc in next sc, ch 2, [P2]

*in ch-2 corner space (tr, ch 3, tr), ch 2, sc in next sc, (ch 2, tr in next sc, ch 2, sc in next tr) 5 times, ch 2, tr in next sc, ch 2, sc in next sc, ch 2. *

Repeat from * to * 4 times, omit last tr, ch-2, sc, ch-2.
Join to 4th ch with a sl-st.
Stitch count: per side: 7 sc, 8 tr, 14 ch-2 spaces.

r8

9. Ch 1 and sc in same st, ch 1, tr in next sc, ch 1, sc in next tr,

*in ch-3 corner space (sc, ch 2, sc), (sc in next tr, ch 1, tr in next sc, ch 1) 7 times, sc in next tr. *

Repeat from * to * 4 times, omit last sc, ch-1, tr, ch-1.
Join to 1st sc, fasten off, and secure ends.
Stitch count: per side: 10 sc, 7 tr, 14 ch-1 spaces.
Hint: your square will curl up at the corners.

r9

 10. Join with a standing dc in last st before any ch-2 corner space,

*in ch-2 corner space (2 dc, ch 3, 2 dc), skip next st [hidden st] [P3],
(dc in next st, dc in next ch-1 space) 14 times, dc in next 2 sts. *

Repeat from * to * 4 times, omit last dc.
Join to standing dc with a sl-st.
Stitch count: per side: 34 dc.

r10

11. Ch 3 [counts as dc], dc in next 2 sts,

*in ch-3 corner space (2 dc, ch 2, 2 dc), dc in next 34 sts

Repeat from * to * 4 times, omit last 2 dc.
Join to top of ch-3, fasten off, and secure ends.
Stitch count: per side: 38 dc.

r11


Block all squares using same method as with Winnie’s Flower square, start by pinning the centre square, then the mesh area, then the outer edge. Do not over stretch!

wftp-5

End part 5 ♥ See you next week.

♥ Please remember this is my design and is covered by copyright law.
You may share a link to my website or Ravelry store with anyone, you may print the PDF for your own use, but please do not alter, change or share in any way.
Please love and respect me, as I love and respect you. ♥

blog-sig-2


[wysija_form id=”2″]

Save

Save

Save

Save

Save

Save

Save

Save

Save

Save

Save

Save

Save

Save

Save

5 Comments

  1. Vickie
    Vickie on 11th November 2016 at 5:45 am

    Hi Helen, thank you for part 5,I am really enjoying this pattern.But what I really wanted to say was how sorry I am to hear of your loss.I’ve been through it several times and it doesn’t get easier. Our furry friends means so much to us and leave their paw prints on our hearts. Soon you will look back at all the fun times but for now it’s too sad.
    Love and blessings,Vickie xx

    Reply
    • Helen
      Helen on 11th November 2016 at 8:09 am

      Thank you so much Vickie 🙂

      Reply
  2. Patricia
    Patricia on 11th November 2016 at 1:29 am

    Beautiful

    Reply
  3. Sharon Copsey
    Sharon Copsey on 10th November 2016 at 10:05 pm

    How lovely to see a photo of your Mum Helen. As soon as I saw it I thought ‘I know you’. I also am in the Guiding movement and over many years spent quite a few hours being taught by her. She looks amazingly well, please pass my regards to her although I’m sure she will not remember my name.

    Reply
    • Helen
      Helen on 11th November 2016 at 8:10 am

      Small world Sharon! I will tell her and pass on your regards 🙂

      Reply

Trackbacks/Pingbacks

  1. Whispers from the Past Part 9 - Crystals & Crochet - […] you wish to make the Eileen and Alana square match with the Winnie's square, you will need to make…

Submit a Comment Cancel reply

Your e-mail address will not be published. Required fields are marked *

My Info

003 (3)

Hi I’m Helen!

I LOVE anything and everything to do with crafting and creativity. Nothing gives me more pleasure than helping others to learn and achieve their dreams.

You can also find me on Facebook and Pinterest, by clicking the little icons at the top of the page.

Partners

My Recommended Suppliers

Subscribe to Our Newsletter

Subscribe to our newsletter and keep up to date with all our news.

I agree to Crystals and Crochet holding information about me in accordance with its privacy policy.

Check your inbox or spam folder now to confirm your subscription.

Adsense

Quick Links

  • Home
  • Profile
  • Blog
  • Crochet
  • Crystals
  • Words Of Wisdom
  • Contacts
  • Facebook
  • Pinterest
  • Youtube
© Crisp Webdesign
7 Orchard Park, Station Road, Bugle. Cornwall. PL26 8NW