Sign Up
Already have an account? Sign in here
Sign In
Dont have an account? Sign up here
3 Ways to Join Yarn
When you are working with most projects, there will come a time that you need to join a new ball of yarn, especially with large projects.
Here I cover 3 different ways of joining new yarn of the same colour, to seamlessly continue with your project.
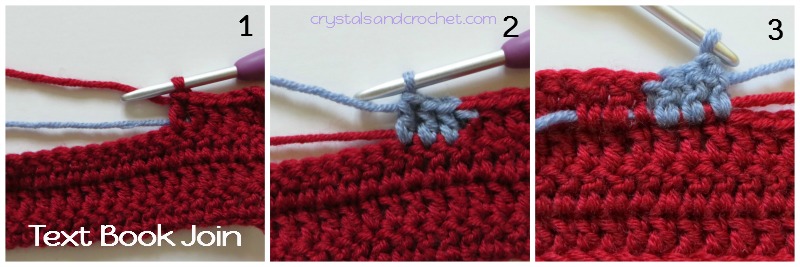
Text Book Join
I call this the “Text Book Join” as it was the way I first learned, and is the way many classes are taught.
Simply lay your new yarn on top of the row or round you are working, and work over the new yarn for a few stitches. Pick up the new yarn at the bottom of your stitch and continue, working over the old yarn for a few stitches.
You can either work the tail ends in as you go, or sew them in afterwards.
This join works with any type of yarn, and as long as you secure your ends correctly, it will always remain secure.
To show the join more clearly I have used two different colours in the photos below.
Photo 1 shows the new yarn laying underneath the stitches made with the old yarn.
Photo 2 shows the new yarn picked up and the old yarn being worked over.
Photo 3 shows the join from the back.
When this is worked with the same colour, the join is invisible.
Magic Knot
The “Magic Knot” is a bit of a controversial joining method, as many people don’t like knots in their work, or some think it is the “wrong” way to join.
There is no such thing as the wrong way!!
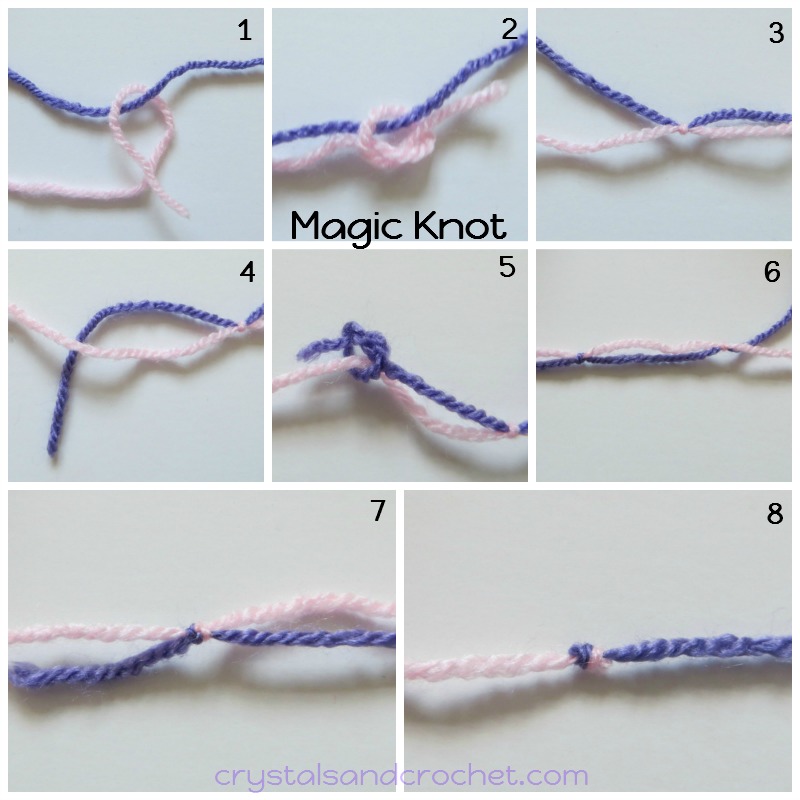
Again I have used two colours for this tutorial.
The existing yarn is shown with purple, and the new yarn is show with pink.
Place both strands of yarn parallel to each other with the old yarn on top and the new yarn beneath.
1. Pass new yarn under old yarn, and cross over.
2. Pass end through loop.
3. Pull tight.
4. Pass old yarn under new yarn and cross over.
5. pass end through loop.
6. Pull tight, giving you two knots.
7. Pull on each strand of yarn, to pull two knots together.
8. Be brave and cut as close to the knot as you can.
This join works really well with acrylic yarns, and yarns with some texture to them. I have found that the knot will not grip with some very silky yarns.
Just give a really hard tug and you will soon see if this joining method will work with your yarn.
This video tutorial shows how to change colour at the end of a row using the magic knot.
Russian Join
This is a great way to join yarn that has a tight twist to it.
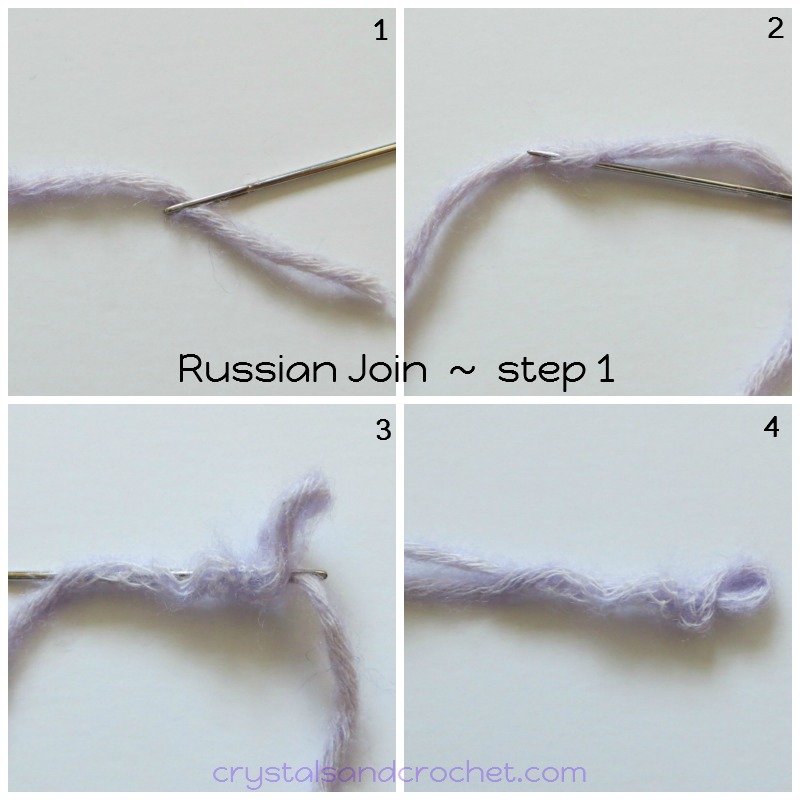
Again I have used two colours for this tutorial.
1. Take the end of your old yarn, thread on a yarn needle.
2. Make several small stitches through the old yarn, approx 2 inches.
3. Pull the needle through the yarn.
4. Leaving a loop at the end and the stitched section gathered up.
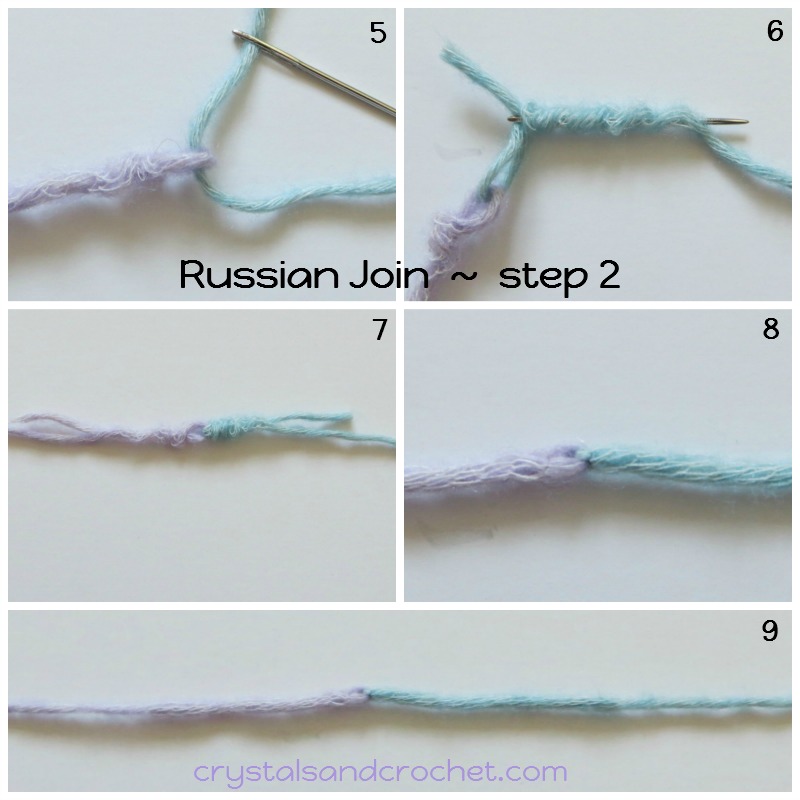
5. thread your new yarn on your needle, and thread through loop of old yarn.
6. Make several small stitches through the new yarn, approx 2 inches.
7. Pull the needle through the yarn.
8. Pull on the two tail ends to bring the loops together.
9. Pull on the main strands of yarn, both old and new at the same time. As you do this the tail ends will be pulled into the join.
Snip off any protruding tail ends.
This one takes a bit of practice, and again won’t be suitable for every type of yarn.
Having choice is what life is all about, so try all the different ways of joining and see what works best for you and the project you are working on, or the types of yarn you like to use.
I hope you find this tutorial helpful.
♥ If you need help and advice, the quickest way to find support is to join Helen’s Hookaholics Facebook group. There you will find a very supportive group of likeminded people. It’s also a great place to share your crystalsandcrochet makes, and see what others are making, and see what I am up to.
♥ If you are not a fan of Facebook you can always email me with any questions you may have by using the contact form here.


