Sign Up
Already have an account? Sign in here
Sign In
Dont have an account? Sign up here
Starting and Standing Stitches
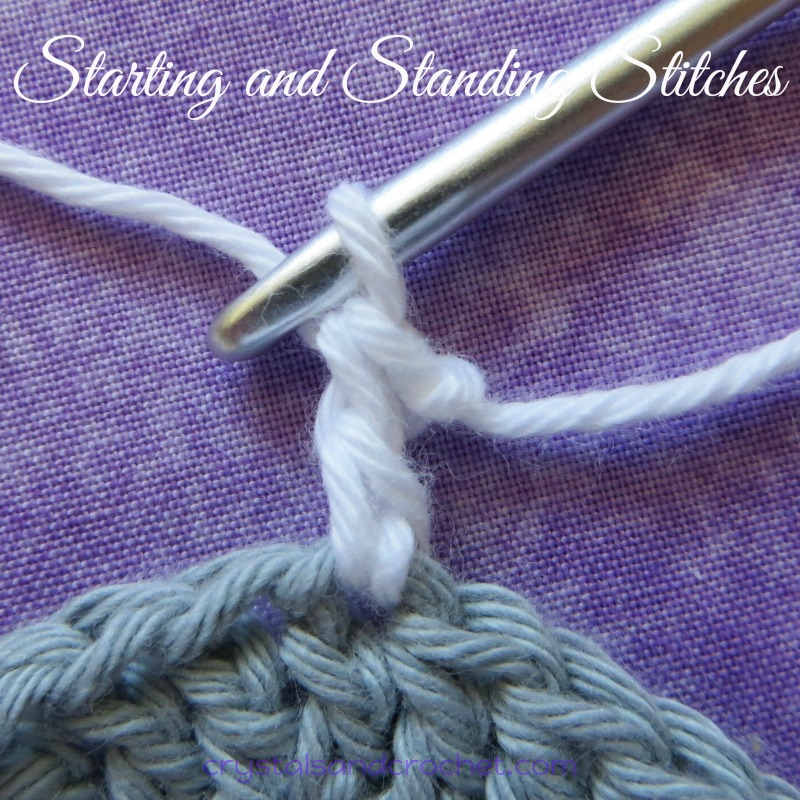
What’s the difference?
Well….. a starting stitch is used at the beginning of a round or row, where you are continuing in the same colour. Rather than have the “skinny stitch” of a chain 3 [for a double crochet] or chain 4 [for a treble crochet], a starting stitch will give you more consistency with your other stitches.
A standing stitch is used when joining yarn in a new place, or a new colour.
There are many different ways to make a starting stitch, it’s just about practice and finding the way that works for you.
But this is my way…..
♥ Starting Double Crochet worked in the round.
1. Complete your last stitch.
2. Using a starting stitch gives you a “normal” 2 loops to work into.
3. Change to a smaller hook, I normally use a hook 2 sizes smaller.
4. Put your smaller hook through the 2 loops of your 1st stitch.
5. Yarn over.
6. Pull through all loops on hook.
7. Make a chain 1 as you normally would when moving up into the next round/row.
[this chain 1 will be smaller than normal, as you have used a smaller hook.
8. Remove your hook.
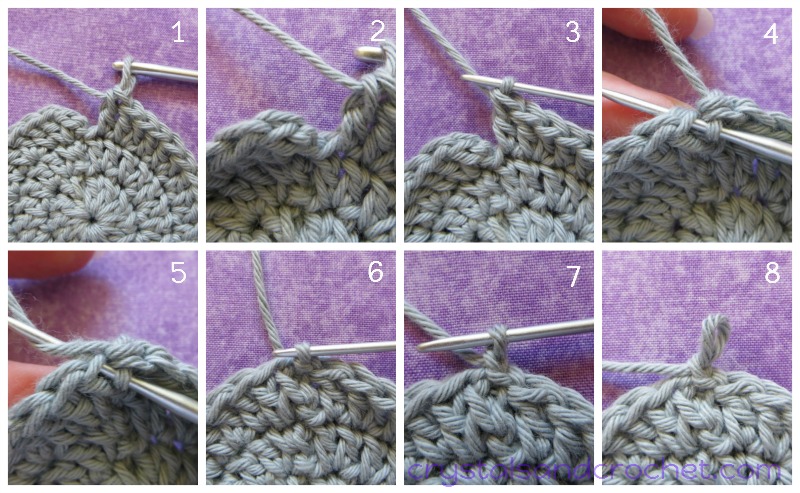
9/10. With your normal sized hook, yarn over.
11. Insert your hook from behind the loop, with your working yarn between the 2 loops.
12. Insert your hook in the same stitch as your sl-st join, yarn over and pull through a loop.
13. Yarn over and pull through 2 loops.
14. Yarn over and pull through 2 loops.
15. Continue to work as normal.

As you can see all of your stitches are now of a consistent size, and if you use an invisible join, you will find it very difficult to find the “seam” in your work.
When working in rows, exactly the same principals apply, you will also find it much easier to keep the edges of your work straight.
1. Finish the last stitch of your row as normal.
2. Chain 1.
3. Remove your hook.
4. Turn your work, and yarn over your hook.
5. Insert hook from behind your working loop, with your working yarn between the 2 loops.
6. Insert your hook into the 1st stitch, yarn over and pull up a loop.
7. Yarn over and pull through 2 loops, twice.
8. continue working as normal.
9. You can easily find the 2 loops to work your last stitch into.
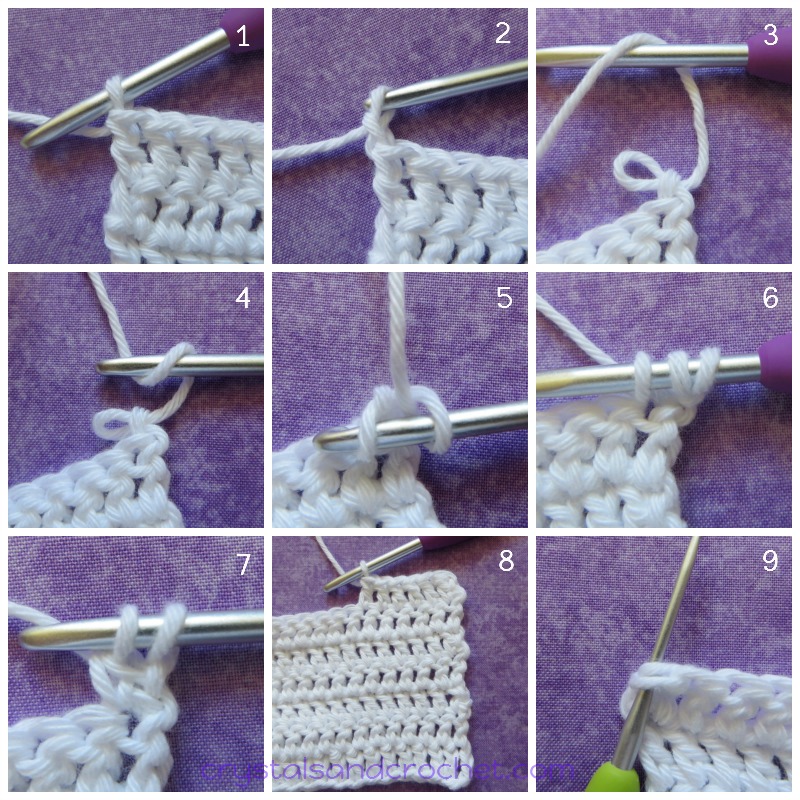
The little “bump” you see on the edge of the stitch is caused by the chain 1, this will easily be covered by any border you add to your work.
♥ STANDING STITCHES.
Standing stitches are used to join a new colour, or to start a new round in a different stitch to your finishing stitch of the previous round.
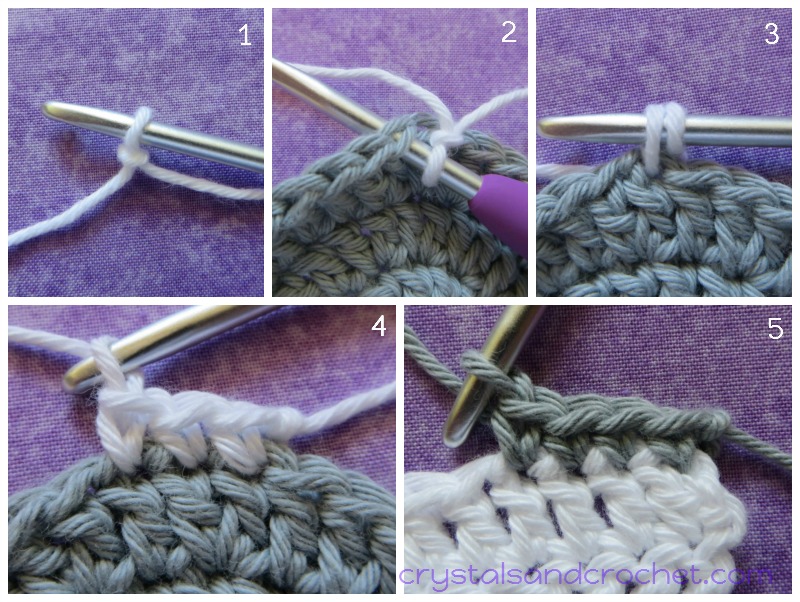
♥ Standing Single Crochet.
1. Make a slip knot.
2. Insert your hook through stitch or space as instructed in your pattern.
3. Yarn over and pull up a loop.
4. Yarn over and pull through both loops on hook, and continue as normal.
5. Use exactly the same process when working in rows.
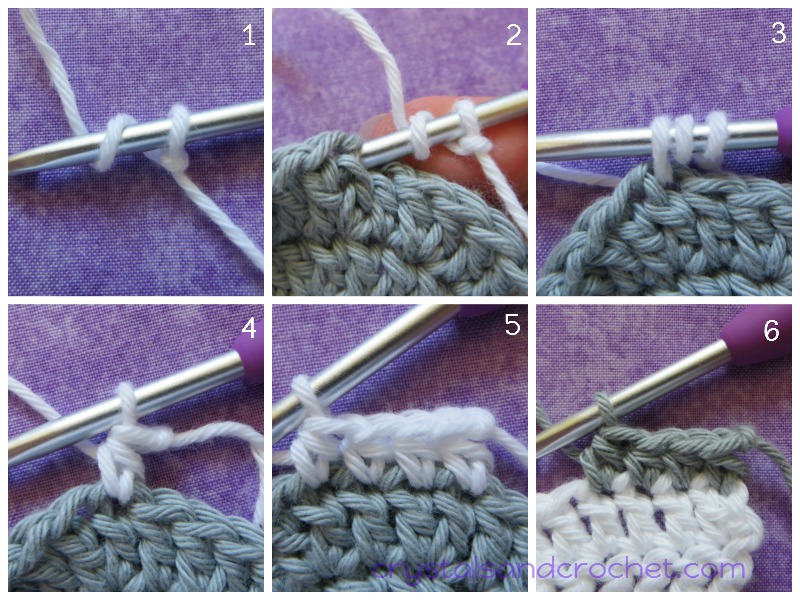
♥ Standing Half Double Crochet.
1. Make a slip knot, and yarn over hook once.
2. Use your finger to hold your yarn, and insert hook into stitch or space as instructed.
3. Yarn over and pull up a loop.
4. Yarn over and pull through all 3 loops.
5. Continue as normal.
6. Use exactly the same process when working in rows.
♥ Standing Double Crochet.
1. Make a slip knot, and yarn over hook once.
2. Use your finger to hold your yarn, and insert hook into stitch or space as instructed, yarn over and pull up a loop.
3. Yarn over and pull through 2 loops.
4. Yarn over and pull through 2 loops.
5. Continue as normal.
6. Use exactly the same process when working in rows.

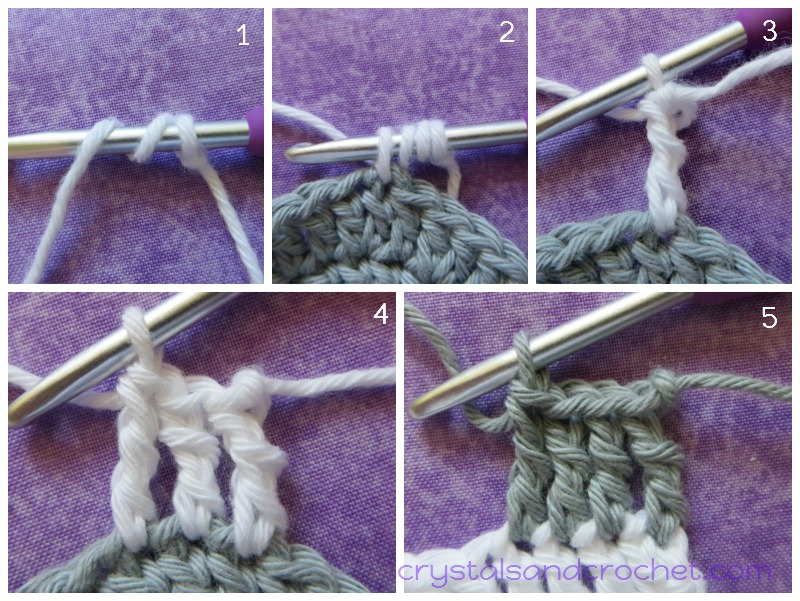
♥ Standing Treble Crochet.
1. Make a slip knot, and yarn over hook twice.
2. Use your finger to hold your yarn, and insert hook into stitch or space as instructed, yarn over and pull up a loop.
3. Yarn over and pull through 2 loops, 3 times.
4. Continue as normal.
5. Use exactly the same process when working in rows.
I hope you find this tutorial helpful, please don’t hesitate to ask any questions and do let me know if there is anything else you would like me to cover in my tutorials.

♥ If you need help and advice, the quickest way to find support is to join Helen’s Hookaholics Facebook group. There you will find a very supportive group of likeminded people. It’s also a great place to share your crystalsandcrochet makes, and see what others are making, and see what I am up to.
♥ If you are not a fan of Facebook you can always email me with any questions you may have by using the contact form here.


